| Oracle® Enterprise Manager Grid Control Quick Start Guide 10g Release 2 (10.2) Part Number B28678-03 |
|
|
View PDF |
| Oracle® Enterprise Manager Grid Control Quick Start Guide 10g Release 2 (10.2) Part Number B28678-03 |
|
|
View PDF |
Before you begin using Enterprise Manager, you need to establish standard administrative settings. System security is a major concern of any corporation. There are advantages of giving controlled access to the systems to various administrators but individually granting access to tens, hundreds, or even thousands of targets to every new member of the group is time-consuming and unreliable in terms of security. Enterprise Manager lets you easily and quickly set up roles and make other administrative settings before other users can use it.
The following sections help you get started with Enterprise Manager:
Enterprise Manager roles allow you to group system and target privileges, and to grant these to administrators or other roles. Privileges give the administrator rights to perform certain management actions within Enterprise Manager. Roles help you limit target access and access to specific management features. Using roles and privileges, you can manage security across all functional areas of Enterprise Manager.
The main kinds of accounts are Super Administrator and Administrator. A Super Administrator account, called SYSMAN, is created by default while installing Oracle Enterprise Manager. A Super Administrator can then create, modify, or delete Enterprise Manager roles, perform almost any action on almost any target in the system, and see all Enterprise Manager configuration and system monitoring functions. The breadth of tasks available in Enterprise Manager depends on the privileges assigned to various roles.
A Super Administrator divides workload among her administrators by filtering target access, or filtering access to management tasks, or filtering both through the privileges she grants to roles. System privileges allow an administrator to perform systemwide operations, such as view or add targets, use beacons, monitor Enterprise Manager, and so on. Target Privileges allow an administrator to perform operations on a target.
Tip:
For security reasons, Oracle recommends that the SYSMAN account be used only as a template to create other accounts, and not used directly.Linda is a super administrator who needs to set up accounts for her team of administrators. She needs to first create roles and then assign them to various administrators. Each administrator might require a different set of privileges. For example, a database administrator requires access to managed databases, but not to the application server that uses the database. A Web administrator might require the privilege to manage beacons or create targets without requiring any privileges on the databases.
This topic describes how to use Enterprise Manager to create an administrator account and assign privileges to it.
To create an administrator account:
Click Setup in the Grid Control console.
Select Administrators from the panel to the left.
The Administrators page appears. It lists existing accounts. You can search for a specific administrator account, create a brand new administrator account or one based on an existing account, view roles, system, and target privileges for an administrator, make changes to an existing administrator account, or remove an administrator.
Click Create to create a new administrator account.
This brings up the Create Administrator wizard. Using this wizard, you can specify details such as the role to apply to the account and the system and target privileges to be assigned to the role.

Click Continue.
Click OK.
A notification schedule is a rotating schedule used by Enterprise Manager to determine which notifications to send to which administrators. When an alert needs to be e-mailed to an administrator, Enterprise Manager consults that administrator's notification schedule to determine the e-mail address to use.
When either a warning or critical metric threshold is exceeded, alerts are triggered and they, in turn, activate notification methods, if they have been set up. A notification method is a way to take the information from an alert and send notifications to another management system or ticketing system. Notification methods may include e-mail, SNMP traps, or custom scripts. The ready-to-use account, SYSMAN, is by default set up to receive all alerts.
See also "Managing Alerts and Notifications".
When accounts have been created for administrators, they need to log in to Grid Control to customize their preferences. One of the administrators, Joe always receives alerts on his work account. When Joe is out of his office, he needs alerts to also be sent to his mobile device. Accounts can be set up for such alerts. Joe has a rotating schedule where every third week, he works late on Wednesday and Friday. Alerts need to be sent out taking his schedule into consideration.
This topic describes how to use Enterprise Manager to set up a notification schedule, including setting notification methods and defining a schedule by which to send out notifications.
To create a notification schedule:
Click Setup in the Grid Control console.
Click Notification Methods in the panel to the left.
The Notification Methods page appears. If you want notifications to be sent out using OS commands, PL/SQL procedures, or SNMP traps, you can define them on this page. For example, you can create a notification method to pass critical production alerts to the system administration tool HP OpenView round the clock. To do so, you can create an OS method that calls an HP OpenView perl script as /bin/methods/hpovo.pl.
Click Apply.
Click Preferences in the Grid Control console.
The General page appears. On this page, you can specify the e-mail addresses to which you want notifications sent.
Click Schedule under Notification in the panel to the left.
The Notification Schedule page appears.
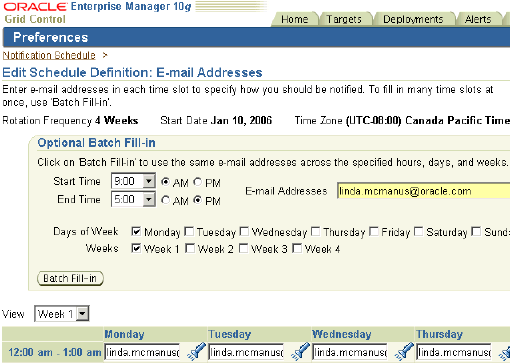
Click Define Schedule.
The Edit Schedule Definition page appears. You can specify the frequency at which you want notifications to be sent to you, the time zone, the start date, and so on. You can also specify e-mail IDs at which you want notifications for a given time period to be sent.

Click Finish.
The notification schedule is defined for the selected account.
Preferred credentials simplify access to managed targets by storing encrypted target login credentials in the Management Repository. They help administrators manage multiple databases and targets without requiring them to manullay enter their passwords each time they access a target or run jobs. Preferred credentials are specific to each user, thus ensuring the security of the managed enterprise environment. With preferred credentials set, you can access an Enterprise Manager target that recognizes those credentials without being prompted to log in to the target. You can set preferred credentials for the following target types:
Hosts
Databases
Clusters
Oracle Real Application Cluster (RAC) Databases
Application Servers
Database administrators in Linda's team need to provide database-level credentials to be able to monitor performance or do any administrative action through Grid Control. By setting up preferred credentials, they will be able to quickly access these areas without reentering their credentials. Also, the Oracle Enterprise Manager job system can use these credentials for scripts or jobs that run against these targets.
To set preferred credentials:
Click Preferences in the Grid Control console.
Click Preferred Credentials in the vertical navigation bar.
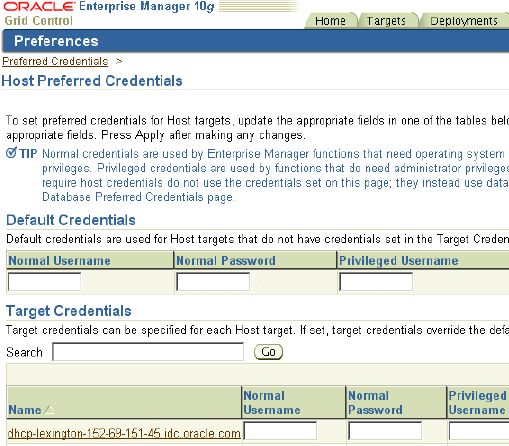
The Preferred Credentials page appears, providing a top-level view of all preferred credentials set for your Enterprise Manager environment. From this page, you can set preferred credentials for any managed target types listed in the Preferred Credentials table. Each row of the table provides a credential summary for a type of target.
Click the icon in the Set Credentials column for a selected target type.
The Preferred Credentials page for that target type appears. You can set default credentials and target credentials for the target type. The target credentials are selectively set for specific targets and override the default credentials. 
Click Apply.
The new credentials are applied to the targets and target type as specified.
Oracle By Example (OBE) has a series on the Oracle Enterprise Manager Grid Control Quick Start Guide.
The following OBEs cover the tasks in this chapter with annotated screen shots:
Setting Up Enterprise Manager Grid Control: http://www.oracle.com/technology/obe/obe10gEMR2/Quick_Start/creating_roles_administrators/creating_administrators_and_roles.htm
Notifications: http://www.oracle.com/technology/obe/obe10gEMR2/Quick_Start/notification/notification.htm
Preferences: http://www.oracle.com/technology/obe/obe10gEMR2/Quick_Start/preferred_credentials/preferred_credentials.htm